
If you’re anything like me, you have a ton of side project ideas bouncing around your head, but you have a hard time getting past the project setup steps that have to happen before you can build the thing.
There are options out there for quickly starting projects, but they’re usually tied to a specific framework, like Next for React, or Nuxt for Vue, and they usually come with hidden dependencies, opinionated architectures, and features that you may or may not need.
So let’s learn how to build our own starter templates. Doing so will give us total control over the build process, allowing us to choose defaults that make sense for our specific project and giving us the flexibility to change these defaults over time.
In this series, let’s explore how to build a starter template for Eleventy projects and examine the difficult choices that we often face when starting new projects. The goal here is to make those tough choices upfront so that when we use this template for any future project, we can get started right away.
What Is Eleventy?
Eleventy is a static site generator that is similar to Jekyll or Hugo, but built with Node.js. It is an extremely lightweight generator, and its “Getting Started” instructions are notoriously brief. Eleventy is laser focused on building HTML from templates, and everything else (CSS/JS build processes, linting, testing, etc.) is “bring your own.”
Since it has so little out of the box, it seems like a good candidate for a starter repo.
What Are Template Repositories?
Template repositories are features of GitHub that allow you to create a repository that can be used as the starting point for other repositories.
On the “Settings” page for your repository, there is an option called “template repository.” If you check that box, a button will appear on your repo’s homepage that says “use this template”.
If you click that button (or navigate to github.com/ownername/reponame/generate), you will see a form that lets you:
Choose a name for your new repository
Add a description
Set the repo to public or private
Choose whether to include all branches from the template repo
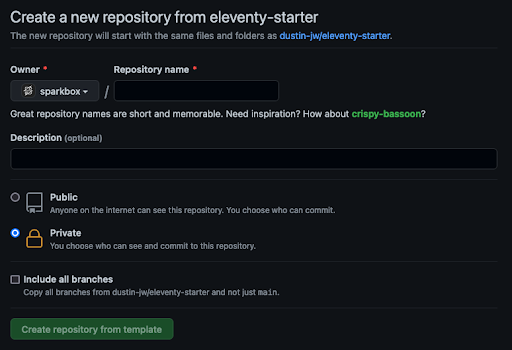
Once you submit that form, you should have a brand new repo that’s identical to your template, but without any git history. It essentially takes a snapshot of the template repo and uses all of those files to create an initial commit for your new project.
What Makes a Good Starter Template?
By the end of this series, we want to have a starter template that covers the vast majority of behind-the-scenes project needs, so that we can start building the thing right away. At a minimum, we want the following to be good to go out of the box:
Let’s break these down and define some goals for what we want our project starter to do.
Project Setup and Configuration
Every project has to start somewhere. Part One of this series will cover the basics for setting up a project, including initializing Git and npm, adding basic configuration files, and building our first page with Eleventy.
HTML
As the backbone of any web project, we need our HTML to be rock solid, and we want to repeat ourselves as little as possible. We will need layout files that define the basic HTML structure and dynamic content sections where page-by-page HTML will go.
We’ll cover all of that in Part Two, and we’ll also set up pa11y-ci to make sure our HTML output is valid and accessible.
CSS
Once we have HTML in place, it’s time to start styling it with CSS. At this point, we need to decide whether to use a third-party thing like Bootstrap or Tailwind to write our own custom styles. Since this will be a starting point for future, undefined projects, we’ll want it to be flexible, or at the very least, replaceable.
We’ll also need to make some decisions about browser support. If you’re still stuck supporting IE11, it may not be practical to use a lot of CSS custom properties, and you might need something like autoprefixer. However, if you’re only going to support modern browsers, you have a lot more tools at your disposal.
Part Three of this series will cover setting up CSS support, starting with a simple build process for custom styles written in SCSS, and ramping up to a more complex build process that includes more third-party tooling. We’ll also set up linting with stylelint.
JavaScript
With HTML and CSS out of the way, the next area of focus should be JavaScript (JS). We want to be able to serve only as much JavaScript as we need, and in a format that makes sense for the browsers we’re supporting.
Since we’re creating a starter template that could be used for anything from a simple blog to a highly-interactive web app, we’ll set up a build process that should work for even the most complicated cases, just in case you need it. Again, browser support will affect the build process and patterns for serving JS, so supporting legacy browsers will add more complexity and maintenance overall.
Part Four of this series will cover JS support, including a modern JS build process, as well as support for linting with ESLint and testing with Jest. We’ll expand on that in Part Five, covering a legacy JS build process for older browsers and adding TypeScript support.
PWA Requirements and Service Workers
We want our project template to work as a Progressive Web App, which for our purposes means that it meets the minimum requirements to be installable. To meet that mark, it’s mostly a matter of making sure the right files exist and that a service worker is registered.
For the service worker, we’ll need to choose a strategy for fetching and caching that will work well for most projects. We can always adopt more advanced strategies for our service workers, but for the starter template, we want a solid foundation that we can build on in other projects.
In Part Five of this series, we’ll work through the checklist of things that need to be done to get our template working as a PWA, and we’ll add a service worker that uses a cache-falling-back-to-network strategy.
Code Quality and Maintenance
From the earlier sections, we should have linting and testing set up, but we can take further steps to ensure a high level of code quality. Some things worth considering:
Ensuring linting and test scripts pass before merging Pull Requests
Tracking test coverage levels
Putting in performance budgets and regularly testing deploys
Keeping third-party dependencies up to date
Creating templates for Issues and Pull Requests, if you’ll be working with others
Setting up automatic deployments, for production and/or branch deploys
Part Six of this series will go into more depth on these topics, and we’ll set up the tooling to make sure our code is high quality and easy to maintain.
So, Let’s Get Started
To recap, GitHub lets us set up reusable project templates which will let us hit the ground running for future projects and bypass all the boilerplate and configuration that often consumes the early days of a new project.
We’ve chosen to use Eleventy for our starter template, but the same principles could apply to any other project. If you have a go-to language or framework that you use for lots of projects, it might be worth setting up your own starter to make your work easier.
We’ve only just begun here, but we have a solid foundation for our starter template that we will keep building on in the rest of this series. Join us for Part One, where we’ll get our project structure set up and build our first page with Eleventy.
