
You have probably heard by now that testing your software is important, but why? Testing is important for many reasons. Testing your software can increase the efficiency of your project development cycle. It can also help expose security vulnerabilities within the codebase. Lastly, having a robust test suite can facilitate the addition of new features while maintaining a high standard of quality.
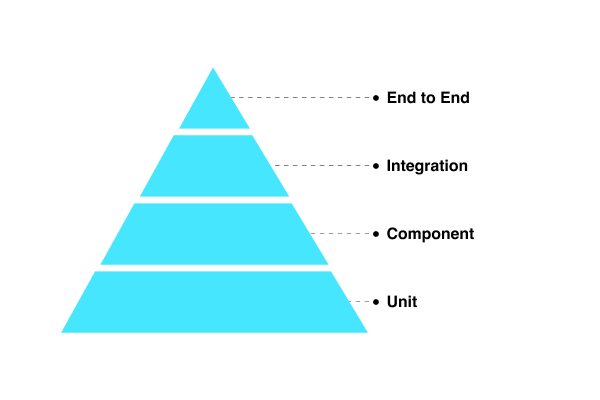
The testing pyramid groups tests into various categories. Similar to the nutrition pyramid, the quantity of tests should theoretically decrease as you move up in category, and having tests from each category will allow you to have a well-rounded testing suite.
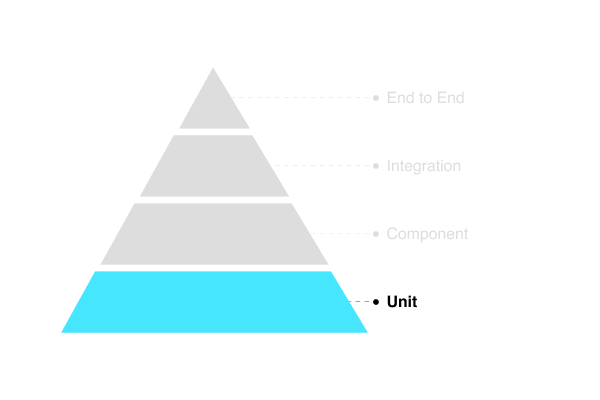
Unit Testing
We’ll begin your testing journey at the bottom of the testing pyramid. Unit testing is the testing of individual modules or functions. For example, if your project is a calculator app, an appropriate unit test would evaluate whether your summation function is working as expected. When calling sum() with a list of numbers, is the returned value what we expect? We can find out by using a tool like Jest, which is a test runner and an assertion library all in one like this:
import sum from ('./calculator')

describe('Given a visitor wants to perform some calculations', () => {
    describe('when adding a list of nums', () => {
        test('it returns the right value', () => {
            expect(sum(1,2,3).toBe(6))
        }
    }
})
The describe blocks are just a way to set up and annotate the test assertion. Check out a more in-depth article about unit testing from Corinne.
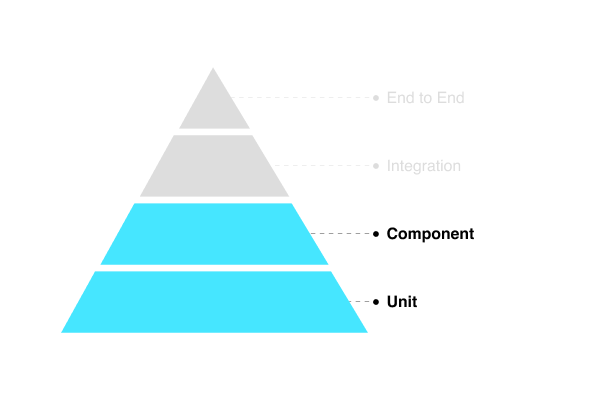
Component Testing
Moving up one layer in our testing pyramid, we arrive at component testing. This has a slight resemblance to unit testing in that components are being tested in isolation. The end result of utilizing modern frameworks like React, Vue, or Svelte is aggregating components. These components can contain data queries, state, and fire-off events or side effects. As you can imagine, components can be quite simple or become very complex rather quickly. Establishing a robust and maintainable test suite will facilitate the identification of bugs during development, and save you time and effort during future refactoring.
A useful tool that can help us in testing components among other things is Testing Library. This library supports many UI frameworks and other testing tools. For our example, let’s write some tests for a simple React component that renders a list of Pokémon.
function PokemonGrid() {
  const [pokemon, setPokemon] = useState(null);

  const [favoritePokemon, setFavoritePokemon] = useLocalStorageState(
    "favoritePokemonList",
    []
  );


  const favoriteAPokemon = (pokemon) => {
    setFavoritePokemon([pokemon, ...favoritePokemon]);
  };

  const unfavoriteAPokemon = (pokemonUrl) => {
    const updatedPokemon = favoritePokemon.filter(
      (item) => item.url !== pokemonUrl
    );
    setFavoritePokemon(updatedPokemon);
  };

  useEffect(() => {
    fetchPokemon("https://pokeapi.co/api/v2/pokemon").then(setPokemon);
  }, []);

  return (
    <div className="pokemonGrid">
      {pokemon?.map(({ name, url }) => {
        const favorite = favoritePokemon.find((pokemon) => pokemon.url === url);

        return (
          <PokemonCard
            key={url}
            pokemonDetails={{ name, url }}
            actions={{ favoriteAPokemon, unfavoriteAPokemon }}
            favorite={favorite}
          />
        );
      })}</div>
  );
}

export default PokemonGrid;
The component above is doing a few things:
Makes an API call to fetch a list of Pokémon
Maintains state of favorited Pokémon
Declares an unfavorite and favorite action
Renders a
PokemonCardcomponent for each Pokémon in our list
Now let’s take a look at how we would test our component. A test spec could be like the following.
// import dependencies
import React from 'react'

// import API mocking utilities from Mock Service Worker
import {rest} from 'msw'
import {setupServer} from 'msw/node'

// import react-testing methods
import {render, fireEvent, waitFor, screen} from '@testing-library/react'

// mock our pokemon fetching call. We want to test this component in isolation and want to avoid having this test fail due to an error with the pokemon API

const server = setupServer(
    rest.get('https://pokeapi.co/api/v2/pokemon', (req, res, ctx) => {
    // respond using a mocked JSON body
    return res(ctx.json({pokemon: [pokemon..]}))
  }),
)

// establish API mocking before all tests
beforeAll(() => server.listen())
// reset any request handlers that are declared as a part of our tests
// (i.e. for testing one-time error scenarios)
afterEach(() => server.resetHandlers())
// clean up once the tests are done
afterAll(() => server.close())

// now the actual test.
test('server returns successful response pokemon ', async () => {
  server.use(
    rest.get('/https://pokeapi.co/api/v2/pokemon', (req, res, ctx) => {
      return res(ctx.status(200))
    }),
  )

render(<PokemonGrid/>)

// Because our JSON response only returns a maximum of 20 Pokemon, let’s make sure that we have 20 pokemon.
expect(screen.getByTestId('pokemonList').toHaveLength(20))
})
In our spec file above we first import all our dependencies. We then mock out our server since we don’t want to actually hit this API every time we run our tests. This will also increase the resilience of our test suite because if the API is ever down it won’t cause our test to fail. In our test block we then attach our request to the mock server instance we initially created by calling setupServer() and returning a successful status code. Finally, we assert that our component renders the appropriate amount of Pokémon cards.
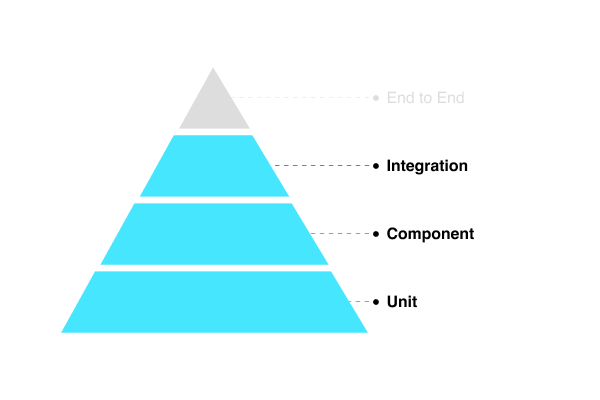
Integration Testing
Up until now all of our tests have occurred in isolation, meaning we’ve tested one module or component at a time. Integration testing is where individual modules are combined and tested as a group. Tests at this level ensure that the different modules within your application are working together as expected. Integration testing is more complex than the other testing types covered because it evaluates the codebase in sections and then as a complete system.
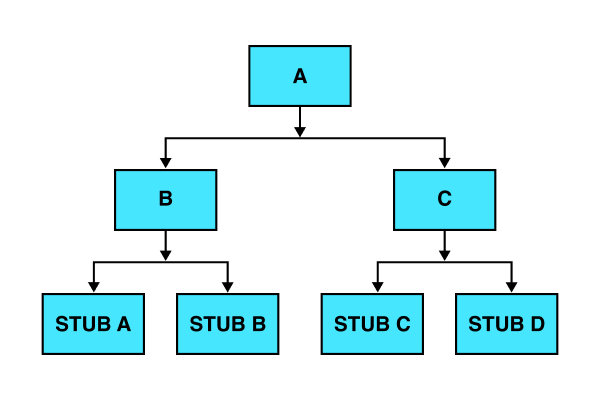
There are different methodologies in which you can approach integration testing: bottom-up, top-down, and sandwich. For example, in top-down testing, you test the integration of higher-level modules while simulating the functionality of low-level modules that have yet to be integrated. As seen in the testing flow below, we would first test how module A integrates with module B, followed by how module A integrates with module C. That would be followed by testing module B’s integration with stub A and stub B, and so on. Each of these integration testing methodologies has its own pros and cons that you will have to decide between depending on your project and its current status.
Learn even more about integration testing types in this overview by UTOR.
End-to-End Testing
End-to-end or E2E or testing is where our tests become a virtual representation of how a user will interact with our app. If a user clicks on a certain button, does the expected behavior occur? Tests at this phase are at a much higher level, at the browser level. In other words, the goal here is to ensure that our users are receiving a great user experience.
You might ask yourself, why don’t we just write these tests? Well, there are several reasons. These tests take a long time to execute relative to unit tests. You could imagine how long your feedback loop would be if your entire application was only tested with this type of test. Furthermore, having E2E tests exclusively is not feasible. There are instances where an E2E test would not be appropriate, like having a utility that caches an API response to the browser’s local storage. One of the major downfalls of E2E tests is how brittle they are. UI changes within an application often result in broken E2E tests.
However, there are benefits to having E2E tests as they can facilitate the identification of customer-impacting bugs, thus optimizing for customer experiences. A popular tool that can assist with E2E testing is cypress. The following is a simple example of testing in which a link is active after visiting the page.
  describe('on all screen widths', () => {
    before(() => {
      cy.visit('/');
    });

    it('displays the active link for the Expertise page', () => {
      cy.findByRole('link', { name: 'Expertise' }).click();

      cy.findByRole('link', { name: 'Expertise' }).should(
        'have.class',
        'cmp-nav__link--active',
      );
      cy.findByRole('link', { name: 'Work' }).should(
        'not.have.class',
        'cmp-nav__link--active',
      );
      cy.findByRole('link', { name: 'Team' }).should(
        'not.have.class',
        'cmp-nav__link--active',
      );
      cy.findByRole('link', { name: 'Contact' }).should(
        'not.have.class',
        'cmp-nav__link--active',
      );
    });
  });
Go Forth and Test
With the number of testing tools available, getting started can sometimes seem overwhelming. I hope that the information found within this article provides a starting point in your testing journey. Below you’ll find links to resources for each of the testing categories included in this article.
